пятница, 23 ноября 2012 г.

Add "Git Bash Here" button to Total Commander


Total Commander my default browser, so very useful to have "Git Bash Here" button on the button bar.
After click path is set:

 How to add "Git Bash Here" button on the button bar:

Configuration -> Button Bar...

Click Add and fill following fields:
Command: C:\Program Files\Git\bin\sh.exe
Parameters: --login -i
Tooltip: Git Bash Here
Icon file: you are able to choose any icon


Click Save.

понедельник, 19 ноября 2012 г.

Install TestNG in Eclipse


This post will explain about installation of TestNG plug-in with Eclipse (Indigo)
There is no need to download any Jar file or exe file for installation.  We need to just utilize the “Install New Software” option available in the Eclipse.
Steps for installation:
1. Click Help –> Install New Software
TestNG-HelpMenu
TestNG-SelectSite
TestNG-Add
2. Type “http://beust.com/eclipse” in the “Work with” edit box and click ‘Add’ button
3. In the ‘Name’ column we can see “TestNG” –> Select this and click ‘Next’ button
TestNG-Install
4.  Click Next and click on the radio button “I accept the terms of the license agreement”
5. Click ‘Next’ button
6. Click ‘Finish’
TestNG-Install wizard
This will install the TestNG plug-in for Eclipse
After the installation, it will ask for restart of Eclipse.  Then restart the Eclipse.
Once the Eclipse is restarted, we can see the TestNG icons & menu items as in the below figures.
TestNG-RunAs
TestNG-NewSelectWizard
TestNG-RunAsTest
It is very much clearly explained how to setup the TestNG with eclipse.  The screenshots make it easy to understand the setting up of TestNG. I hope this will help people who are eager to start using TestNG for their unit testing as well as UI Test Automation with Selenium.

суббота, 17 ноября 2012 г.

Eclipse TOP Hotkeys


Use your hands to write code


You should try to keep your hands on keyboard. The less you touch the mouse, the more code you can write. I am trying to keep the mouse laying still and control the IDE completely using keyboard. What do you think is faster: pressing ALT + C or right clicking the project, selecting Team -> Commit?
It is said, that if a function does not have a key binding, it is useless. Below you will find a set of essential keyboard shortcuts that I love. These shortcuts are set up by default, they should all work.
CTRL + D

Delete row. Try it! You no more need to grab the mouse and select the line, no more Home, Shift + End, Delete. Quick and clean.

ALT + Up/Down Arrow

Move the row (or the entire selection) up or down. Very useful when rearranging code. You can even select more rows and move them all. Notice, that it will be always correctly indented.


ALT + Left/Right Arrow

Move to the last location you edited. Imagine you just created a class Foo, and now you are working on a class Boo. Now, if you need to look at the Foo class, just press Alt+Left Arrow. Alt+Right Arrow brings you back to Boo.

CTRL+SHIFT+O

Organize imports. What happens when you first use a class you have not yet imported? You will see an error. But when you press this magical combination, all your missing classes will be imported, and the unused imports will vanish.

CTRL+1

Probably the most useful one. It activates the quick fix. Imagine you create a class, which implements some interface. You will get an error, because the inherited methods are not yet implemented. While you are on line where the error occurs, press this combination to activate the quick fix. Now, select the "Add unimplemented methods" option. You can use the quick fix at every error you ever receive.

Quick fix comes handy in other situations too. My favorite is the "Split variable declaration". Sometimes I need to broaden the scope of a variable. I activate the quick fix, split declaration, and use alt + arrow to put it where it belongs. You can find even more usages: Convert local variable to field, rename in file, Inline local variable..


You could use the "Split variable declaration" on the bar variable, and then move it with Alt+Arrows above the try block..


Or you could use the "Add unimplemented methods" fix here.

The best thing you can do if you see an error is to use the quick fix.

CTRL+SHIFT+T

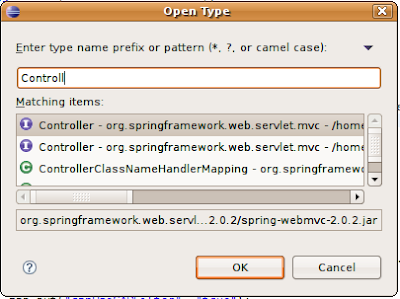
Open Type. Imagine, that you need to have a look at the Foo class. But, where is the Foo class? Is it in the Boo project and in the foo.bar package? Or somewhere else? With this shortcut, you don't need to know. Just press it, type Foo and you are in.


CTRL+E

Shows you a list of all open editors.


CTRL+F6

Use to move between open editors. This is an slower alternative to Ctrl + E. Comes handy in a situation when you want to periodically switch between two editors, something, what is nearly impossible with Ctrl+E as it sorts entries quite randomly. Or you might just use Alt+Arrows..

CTRL+F7

Move between views. When in editor, press Ctrl+F7 to switch to the Package Explorer, or hold Ctrl and press F7 multiple times to switch to other views.

CTRL+F8

Move between perspectives. The same as previous.

CTRL + F11

Runs the application. What gets launched depends on your settings. It will either launch the last launched class (my preffered way) or it will launch currently selected resource (the default way). If you want to change its behavior read the previous post.

CTL + N

Open new type wizard. This is not very quick because you have to select the wizard type (weather you want to create new class, jsp, xml or something else) in the next step. Much faster way would be if you could just hit the shortcut and invoke the particular wizard. It is possible, just keep reading..

CTRL + M

Maximize or umaximize current tab.

CTRL + I

Corrects indentation.

CTRL + SHIFT + F

Formats code. You can make a beautiful looking code out of a mess with this. It requires a bit of setup, but it is well worth it. You can find its settings under Window->Preferences->Java->Code style->Formatter

CTRL + J

Incremental search. Similar to the search in firefox. It shows you results as you type. Don't be surprised, if you hit this combination, nothing happens - at the first glance. Just start typing and eclipse will move your cursor to the first ocurence.

CTRL + SHIFT + L

Shows you a list of your currently defined shortcut keys.

I don't like your shortcuts

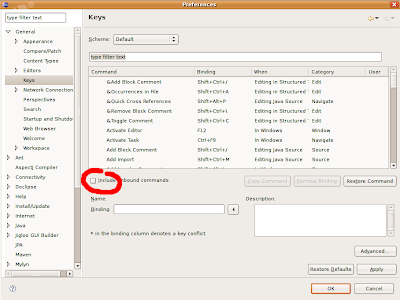
Such is life nowadays. Remember, you can always change those bindings to match your preferences. Open Windows->Preferences->General->Keys. Now you can use the filter to find your shortcut and change its binding.
The real fun begins when you cannot find the command you are looking for. The key here, is to have the "Include unbounds commands" checkbox checked. It will show you all commands, even those, which have no keys bound.


While you are here, I recommend to add the following bindings:
CTRL+SHIFT+G

Bind this to "Generate getters and setters". This is a "must have".

ALT+C

Bind this to SVN/CVS "Commit".

ALT+U

Bind this to SVN/CVS "Update".
Now, type "new" (without quotes) in the filter text. You should see a list of all new type wizards. Choose the most frequently used and assign them a shortcut. For example, the most used wizard for me is the new class wizard. Thus I assigned it the CTRL+SHIFT+N keys.


Let me demonstrate a quick way to create new class now.

Hit CTRL + SHIFT + N (or the combination you assigned in the previous step). This should bring up new class wizard. Type in the name and press ALT+E. You can now select a class which will be a superclass for the newly created class. Hit ALT+A and select all implemented interfaces . Now hit ALT+F and your class will be generated. Eclipse will also provide the default implementation for all abstract and interface methods you inherited.
Did you notice the weird underscores everywhere in the dialog? They give you a hint about the shortcut key. Hit ALT and the underlined letter to press the button, check the checkbox or get focus for a textfield.

Did you notice the underscores?

I think that using shortcut keys is the fastest way to productivity and if not, then at least your wrists will say you a silent thanks. Now, don't wait, go on and assign keys to the features you use most.
One final tip from Andriy:
The problem is that there are so many keyboard shortcuts. I used to keep a printout with all the shortcuts I wanted to use. Finally I wrote an Eclipse plugin MouseFeed, which reminds the keyboard shortcuts for the actions called with mouse. You can even tell it to enforce some shortcuts - the action will run only if called with a keyboard shortcut.
So if you are struggling with yourself, if you want to use shortcuts, but always subconsciously touch the mouse, install the plugin and let it enforce the shortcuts - the mouse will be useless and you will be forced to use keyboard.
What shortcuts do you use?

Reference: 

четверг, 15 ноября 2012 г.

Selenium Webdriver with htpasswd (Authentication Required)


How can I use Selenium Webdriver to login to the site with htpasswd - Authentication Required (modal dialog with HTTP basic authentication)


I know only one way to login to the site with htpasswd protection - it is use username and password in the URL (something like this: http://username:password@example.com/test ):

public static void main(String[] args) {

 // Create a new instance of the Firefox driver
 WebDriver driver = new FirefoxDriver();

  // And now use this to visit website with htpasswd
 driver.get("http://username:password@example.com");

}


By the way, this won't work in Internet Explorer because Microsoft has disabled username/password in URLs - ref.
To fix that you can set an "iexplore.exe" DWORD to 0 in HKEY_CURRENT_USER\Software\Microsoft\Internet Explorer\Main\FeatureControl\FEATURE_HTTP_USERNAME_PASSWORD_DISABLE.

воскресенье, 4 ноября 2012 г.

How to integrate Sikuli script with Selenium WebDriver (WebDriver and Sikuli Integration)


How to integrate SIKULI script with SELENIUM WEBDRIVER

Sikuli is a robust and powerful tool to automate and tests user interfaces screenshots. The core of Sikuli Script is written in Java, which means you can use Sikuli Script as a standard JAVA library in your program. This article lets you know how to do that.

1. Download and install Sikuli using the self-extracting installer(http://www.sikuli.org/download.html).
Note: Only 32-bit version is provided for using as a standard JAVA library. But SIKULI IDE could run on both 32-bit and 64-bit Windows systems.

2. Create new Java project (use Eclipse as an example):


3. Fill project name and click Finish:


4. Create new class:


5. Fill class name and click Finish:


6. Include sikuli-script.jar, selenium-server-standalone-2.25.0.jar, selenium-java-2.25.0.jar in the CLASSPATH of your Java project. 


Get sikuli-script.jar from your Sikuli IDE installation path.

Sikuli Script is packed in a JAR file - sikuli-script.jar. Depending on the operating system you use, you can find the sikuli-script.jar in according places.

Windows, Linux: Sikuli-IDE/sikuli-script.jar
Mac OS X: Sikuli-IDE.app/Contents/Resources/Java/sikuli-script.jar

After adding sikuli-script.jar, selenium-server-standalone-2.25.0.jar, selenium-java-2.25.0.jar as a libraries into your project, the project hierarchy should look like this:

After click OK:


7. After configuring in build path, create and initialize an instance of Screen object.

SIKULI + SELENIUM WEBDRIVER


import org.junit.Test;
import org.openqa.selenium.WebDriver;
import org.openqa.selenium.firefox.FirefoxDriver;
import org.sikuli.script.App;
import org.sikuli.script.FindFailed;
import org.sikuli.script.Pattern;
import org.sikuli.script.Screen;

public class sikuliFirstTest {

@Test
public void functionName() throws FindFailed {
// Create a new instance of the Firefox driver
WebDriver driver = new FirefoxDriver();

// And now use this to visit Google
driver.get("http://www.google.com");

//Create and initialize an instance of Screen object    
Screen screen = new Screen();

//Add image path  
Pattern image = new Pattern("C:\\searchButton.png");
    
//Wait 10ms for image  
screen.wait(image, 10);
    
//Click on the image
screen.click(image);
  }
}

Here example using SIKULI without Selenium WebDriver:


import org.junit.Test;
import org.sikuli.script.App;
import org.sikuli.script.FindFailed;
import org.sikuli.script.Pattern;
import org.sikuli.script.Screen;

public class sikuliFirstTest {

@Test
public void functionName() throws FindFailed {

//Open FireFox application with google home page  
App firefox = App.open("c:\\Program Files\\MozillaFirefox\\firefox.exe");
//Create and initialize an instance of Screen object    
Screen screen = new Screen();
//Add image path  
Pattern image = new Pattern("C:\\searchButton.png");
    
//Wait 10ms for image  
screen.wait(image, 10);
    
//Click on the image
screen.click(image);

//Close firefox   
firefox.close();
  }
}

Maximize browser window in Selenium Web Driver(how to get full screen in selenium webdriver)

Maximize browser window in Selenium Web Driver(3 ways how to get full screen in selenium webdriver)

1) The very first method which is given in their documentation is using maximize() command of selenium instance:

public static void main(String[] args) {

 // Create a new instance of the Firefox driver
 WebDriver driver = new FirefoxDriver();

  // And now use this to visit Google
 driver.get("http://www.google.com");

 // Maximize browser window
 driver.manage().window().maximize();

}

2)  Maximize the browser window according to your system's current resolution using the toolkit utility which query the native operating system directly and is platform independent:

public static void main(String[] args) {

 // Create a new instance of the Firefox driver
 WebDriver driver = new FirefoxDriver();

  //Set the upper left corner of the screen starting point
   driver.manage().window().setPosition(new Point(0,0));

  //define screen size
   java.awt.Dimension screenSize = java.awt.Toolkit.getDefaultToolkit().getScreenSize();

  // define desired size
   Dimension maxWindowSize = new Dimension((int) screenSize.getWidth(), (int) screenSize.getHeight());

  // Maximize the browser window according to your system's current resolution(set desired size)
 driver.manage().window().setSize(maxWindowSize);

}

3) Third method emulate enter to fullscreen mode, same as pressing F11:

public static void main(String[] args) {

 // Create a new instance of the Firefox driver
 WebDriver driver = new FirefoxDriver();

  // And now use this to visit Google
 driver.get("http://www.google.com");

 // Find the body and then send F11
 driver.findElement(By.tagName("body")).sendKeys(Keys.F11);

}